 Skip to content
What Is Mapping?
There are so many exciting, fun things about eyelash extensions — glamorous fans, wispy spikes, and the joy you can give to your clients by delivering beautiful results! But before you jump into the actual lashing process, you need to understand how to give each specific client exactly what they want in a healthy way. Even more, you need to be comfortable with mapping designs using classic extensions. Mapping for volume fans can be more complicated, so it’s important to master classics first. This means that you need to understand the basics of mapping, or how to plan out the lengths, curls, and diameters you will use in your chosen map style in advance. This will depend heavily on each specific client’s unique eye and face shapes, along with a few other distinct components.
While this might sound tedious, it is really the only way to ensure that both you and your client will be completely satisfied with the final set. So let’s get into the basics of classic lash mapping, why it’s important, and what you’ll need to give your client the best lashes ever!
Why Is Mapping Important?
You might think you can just “map in your head”, but that can very easily lead to messy, disorganized mapping. Creating a map before you apply extensions will help you keep your set tidy and ensure a neat final product. You wouldn’t want to go through the entire lashing process just to find out that the client’s eyes are lopsided at the end of the service! That’s why executing a clean, legible map before you are lashing is crucial in achieving a flawless, safe extension set.
Lash extensions are not one size fits all, meaning that a set that looks great on one client won’t necessarily be the best choice for another. This is because everyone has different eye shapes, lash quality, and face shapes that will affect which map style you choose. So before every session, you should sit down with your client to assess all of their unique facial qualities and differences.
What To Check Before Mapping
The following are a few different things to keep in mind when selecting your map. This isn’t an exhaustive list, but it should help you get comfortable with assessing clients and noting their differences.
Eye shape: there can be vastly different eye shapes, including round, almond, hooded, or protruding, and more. We’ll get more into the best maps for each specific eye shape below!
Eye spacing: eyes can be wide, narrow, or neutral, which can help determine which lengths you use. If your client has evenly spaced eyes, you can pretty much choose any map you like. For close set eyes, you will want to emphasize the outer eye; wide set eyes should have their inner corners emphasized instead.
Lash strength, length, and density: longer and stronger natural lashes can usually support heavier, fuller sets. So if your client has weaker lashes, you might not be able to give them as dense of a set as they want. If your client has sparse natural lashes, they might not be the best choice for a classic set and might be better suited for a light, but still full, volume set.
Face shape: the wideness of your client’s face can also make a difference in how dramatic of a set you should offer.
Evaluating all of these and more will help you create the most ideal, flattering map for each individual client. Make sure you chat with your client if you need to change anything from what you both agreed on.
How To Choose Lengths For Your Map
Once you’ve decided on the shape you believe will best fit your client, it’s time to start creating it!
Here are a few basic rules for beginning your map.
1) Choosing the maximum length
The longest size you use should be no longer than 2mm more than the natural lash. This is important because using excessive lengths can be uncomfortable and lead to natural lash loss! Just remember Michelle’s calculation:
max length = natural lash length + 2mm
So, if your client’s longest lashes are 8mm, you should not exceed 10mm as the maximum length. You might be tempted to give your client the most dramatic, glamorous set, but if they cannot safely handle the lengths you choose, you are not practicing healthy lashing.
2) Have a minimum of 4 lengths per eye
To create beautiful maps that flatter your clients, you will need to use a minimum of 4 lengths on each eye — but more is even better. Using more sizes allows you to transition gracefully between each section and create a fuller set. The more the merrier!
3) Keep the inner corners short
Start short with the inner corner lashes! A good rule of thumb is to match the length of the extensions to the first few inner corner lashes and go up from there. These lashes tend to be weaker and shorter than the rest of the eye, so they usually need shorter extensions compared to the set. Inner corner lashes often tend to sag or fall off if the extensions are too long, which isn’t comfortable or healthy for the client; it’s also just a waste of time and money! So keep these lashes short and save the longer extensions for the middle or outer corner sections.
#PLAQuickTip: Don’t exceed 10mm extensions for the inner corner lashes!
How To Divide Eyepads
Now that you have a grasp on how to choose lengths, you need to actually divide the sections of the eyepads. For this, you will need your chosen eyepads and a colored marker that will stand out from the lashes.
Let’s go through the basic steps that should work on any client:
- Mark the inner and outer corners so you know where the map will actually start and end.
- Divide the eyepad in half or thirds (depending on chosen map) between the inner and outer corners.
- Divide both halves or thirds again, creating more sections. Generally, your longest extensions will go in the outermost section and the smallest in the innermost section.
There are a few other things to consider.
- Remember the tip about not exceeding 10mm at the inner corners? You might divide the map into 4 sections and end up with an 11mm section mapped for the inner lashes. If this happens, just divide that last section in half again and add in a smaller 10mm section! You can keep doing this until you reach the appropriate length for your client’s specific inner corner lashes.
- Even though the longest extensions usually get mapped for the outer corners, that doesn’t mean you have to use them until the very last lash. The last few lashes generally decrease in quality, so you should feel free to drop down a size or two when you notice the lashes become much more delicate than the rest. This will help keep those weaker lashes safe and avoid any hanging lashes that would detract from the overall look of the set.
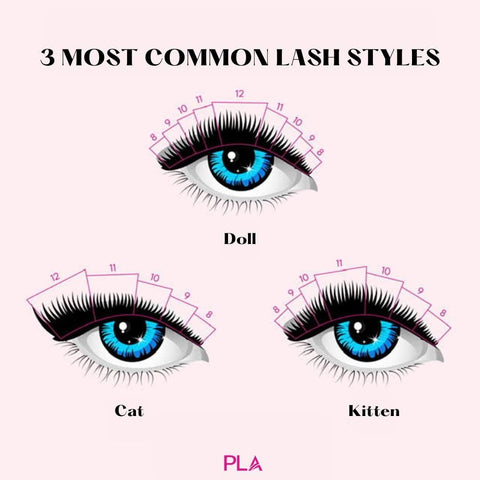
Basic Classic Mapping Styles
Here at PLA, we recognize three basic maps: cat eye, kitten eye, and doll eye. These will each flatter a different type of eye, and might need some alterations to perfectly fit your specific client, but you should be able to follow the steps above to set up each map.
Cat Eye Mapping

A cat eye map can be quite elongating and dramatic, but also suitable for everyday wear. However, it can also take some practice getting quite right. The extensions need to gracefully increase from the inner corner to the outer, and then drop down again at the last few lashes.
To start, divide the eyepad into 2 halves as outlined previously. Then divide the outer section in half again, creating quarters. Find the longest natural lashes (probably near the outer corner) and add 2mm to find the maximum length to use. This longest section will always be the outermost one. From there, drop down 1mm for each section moving inwards.
Kitten Eye Mapping

Need a universally flattering design? The kitten eye map will be your new best friend! Since it follows the natural shape of the eye, the kitten eye can be a very easy way to simulate fuller lashes and open eyes. In this map, the lashes start short at the inner corners, increase until the arch of the brow, and then decrease at the last quarter of the eye.
You’ll begin by dividing the eyepad in half, and then determine the maximum length you will use. Then divide the other half in half again, and place the maximum length in the inner portion near the arch of the brow. After that, divide both the outermost and innermost halves into thirds, and decrease the extension length by 1mm in each as you move to the corners of the eyes.
Doll Eye Mapping

While the doll eye map can be somewhat difficult to execute, it can really elevate almond eyes to whole new level. This style features the longest length exactly at the middle of the set, with symmetrical outer and inner sides. It is not recommended to use this style on round or protruding eyes, as it can accentuate them in a less than flattering way.
Unlike the other maps, you will begin by dividing the eyepads into thirds. Choose your longest length and place it in the center section. Then you can divide the outer third into thirds again and decrease the extension length by 1mm as you move towards the outer corners. The inner and outer thirds of a doll eye have to match, so mirror the outer third onto the inner third. You can add in a fourth section to the outer and inner thirds to reach 10mm if necessary.
Putting this Knowledge into Action
We know, this is a LOT of information. In our in-person classes at PLA, we cover this information over the course of 3 days! But we do want to quickly show you a mapping in person. This is a Kitten Eye Map we did for a Classic Set, using 8-9-10-11-12-11-10-9

And here is the finished set below! We used PLA .20 Flat Lashes for this Classic Set.

Best Maps for Different Eye Shapes
Everyone’s eyes are different, which means that you can’t just give every client the same map and call it a day. You will need to assess each client’s unique eye shape and decide which map will look best on them. Below are some basic eye shapes that should incorporate the majority of your clients and the best map to use on them!
Almond Eyes
Those with almond eyes are thought to have the perfect shape — lucky them! You can really go with whatever map you or your client want with almond eyes, as they will be flattered by a lot of different styles. If you want to elongate their eyes, try a cat eye. If you want to open their eyes more, go with a kitten eye!
Round or Protruding Eyes
These eyes are usually quite large and stand out from the rest of the facial features. You will want to choose a style and curl that helps soften the eyes without giving a surprised look. Using a relaxed curl will help, and you will most likely want to go with a cat eye map to help detract from the roundness of the eyes.
Monolid or Hooded Eyes
Clients with these eyes tend to not have a visible crease or have a heavy lid that hangs over eyes. The lids being covered gives the appearance of smaller eyes, so you will want to try to make them look bigger. A kitten eye will help you achieve this, since it opens the eye more than a cat eye or doll eye. Try pairing it with a strong curl for an even more dramatic result!
Downturned Eyes
Downturned eyes have outer corners that are angled down compared to the inner corners. Sometimes these eyes appear sad, or are referred to as “puppy eyes”. Make sure to avoid a cat eye on these eyes, as it will just exaggerate the downturned outer corners and make the eyes appear droopier. Go with a kitten eye instead to lift the eyes closer to the arch of the brow.
Deep Set Eyes
These eyes are usually placed further back into the eye socket than other categories. They often appear with a prominent, strong brow bone and can appear tired or small. Kitten eye mapping is the best choice for deep set eyes and will help them appear bigger and brighter
While lash extension mapping might not sound like the most exciting part of the lashing process, it is arguably the most important. That’s why you really need to be sure that you understand how to correctly map out your design before you begin your application. With just a little practice, you’ll find that mapping for classic extensions starts to come naturally to you. We hope that these tips help you become confident so you can move forward with all the necessary skills in your lashing career!